
The chain is one of the hardest-working components on your motorcycle, and one of the most neglected. A well-maintained chain lasts 15,000–25,000 miles. A neglected one can fail in half that time — or worse, snap and take out your engine case, swingarm, or your leg.
Chain maintenance isn’t complicated. It just requires consistency.
How Often to Maintain Your Chain
- Clean and lube: Every 300–600 miles, or after riding in rain or dirt — whichever comes first.
- Check tension: Every 500–1,000 miles.
- Inspect for wear: Every 3,000–5,000 miles, or when you notice stretch.
- Replace: When the chain has stretched beyond spec, or you see stiff links, rust, or damaged rollers. Always replace the sprockets at the same time.
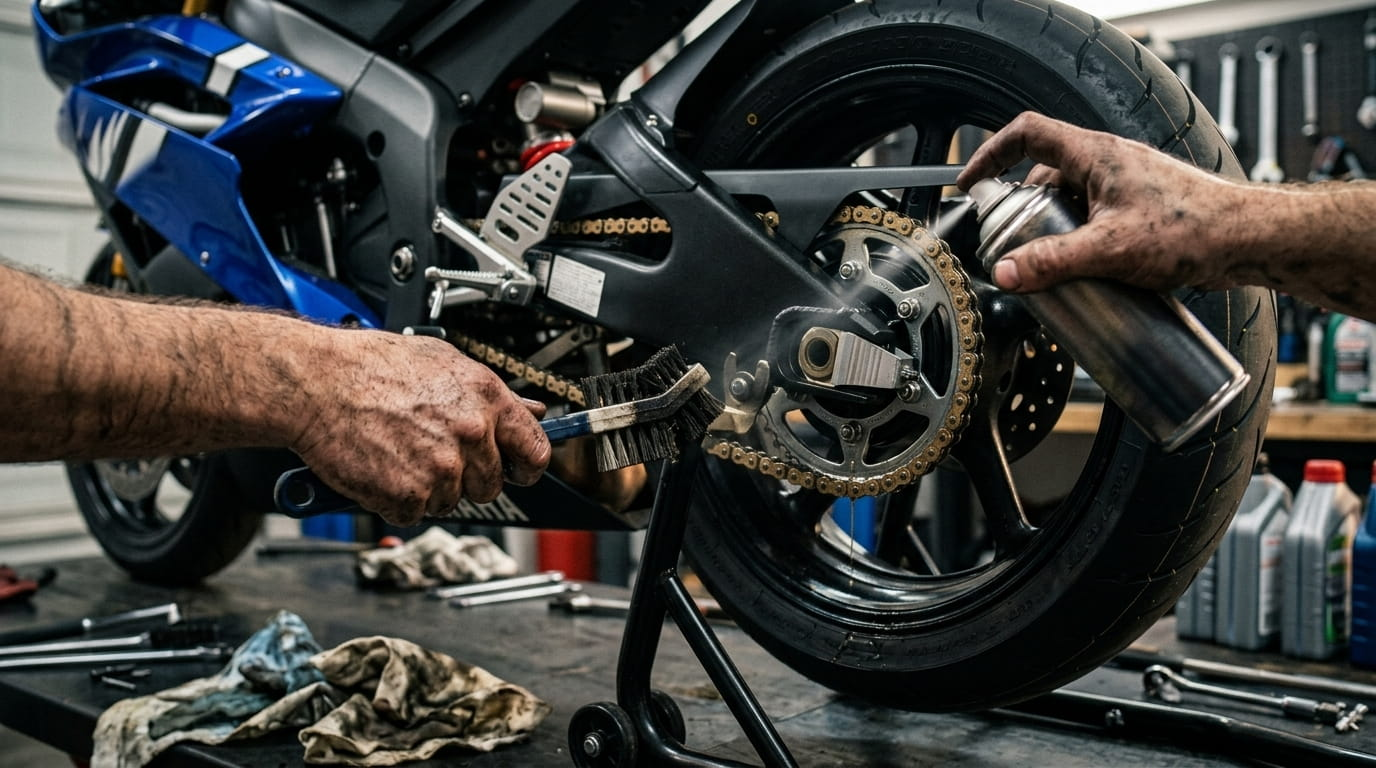
Step 1: Clean the Chain
A dirty chain is an abrasive chain. Road grit and old, gummy lube act like sandpaper against your sprockets and chain rollers.
What you need: Chain cleaner spray (kerosene also works), a stiff brush, and clean rags.
- Put the bike on a center stand or paddock stand so the rear wheel can spin freely.
- Spray chain cleaner on a section of chain, let it soak for 30 seconds.
- Scrub with a chain brush (a dedicated 3-sided brush makes this fast).
- Wipe clean with a rag.
- Rotate the wheel and repeat until the entire chain is clean.
- Let the chain dry completely before lubing. A clean, wet chain doesn’t hold lube well.
Don’t use: WD-40 (it strips the O-ring seals), harsh solvents, or pressure washers aimed directly at the chain.
Step 2: Lube the Chain
Use a dedicated motorcycle chain lube — either wax-based (cleaner, less fling) or wet lube (better for rain). Avoid gear oil or general-purpose lubricants that can damage O-rings.
- Apply lube to the inner side of the chain (the part that contacts the sprocket) while slowly rotating the wheel.
- Apply a light, even coat — don’t glob it on. Excess lube flings off, attracts dirt, and makes a mess.
- Let it sit for a few minutes to penetrate before riding.
Step 3: Check and Adjust Tension
Chain tension affects both handling and longevity. Too tight and you stress the chain, sprockets, and bearings. Too loose and you risk the chain skipping or derailing.
How to check: With the bike on its side stand (which gives you normal sag), find the midpoint of the lower chain run between sprockets. Push up from below. Spec is typically 25–35mm of vertical movement, but always check your owner’s manual for your specific bike.
How to adjust:
- Loosen the rear axle nut.
- Turn the chain adjuster bolts on each side of the swingarm equally — even adjustments keep your wheel aligned.
- Check the alignment marks on the swingarm to confirm the axle is centered.
- Re-tighten the axle nut to torque spec.
- Re-check tension.
When to Replace Your Chain and Sprockets
All three components wear together. Replacing just the chain on worn sprockets accelerates wear on the new chain. Replace the chain and sprockets as a set.
Signs it’s time:
- Chain has been adjusted to the limit of the adjuster range
- Stiff or kinked links that don’t flex smoothly
- Visible rust or corrosion
- Hooked or shark-fin shaped sprocket teeth
- Chain “climbing” the sprocket teeth under load
Log It and Stay Ahead
The easiest way to stay on top of chain maintenance is to track it. Log your clean/lube intervals, note when you last adjusted tension, and set a reminder for your next service. Moto Frontier makes it easy to log all of this in your bike’s maintenance history so nothing falls through the cracks.
The Payoff
A new chain and sprocket set runs $100–$300 depending on your bike. Done right and maintained properly, that set should last you 20,000+ miles. That’s a great return for 10 minutes of maintenance every few hundred miles.
Clean it. Lube it. Keep it adjusted. Simple as that.